About this deal
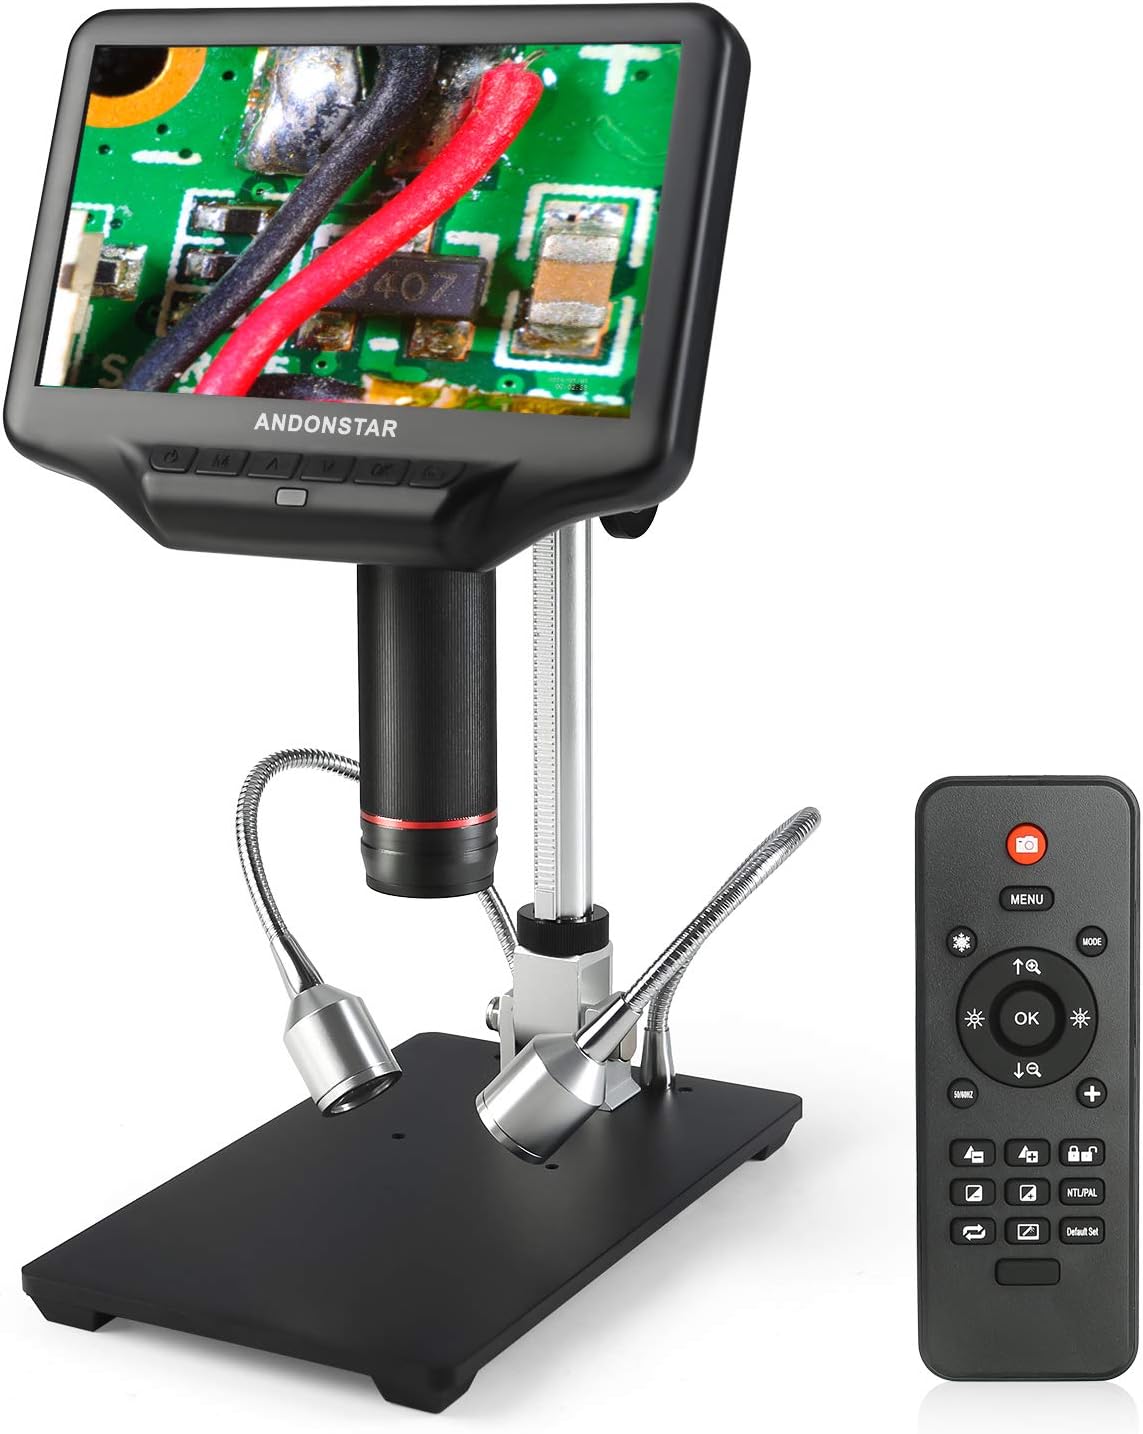
I mainly tested the microscope with SMD soldering. For that, this screen works great. It is big enough not to need a larger, external monitor. This is often necessary when working with microscopes with smaller built-in monitors. With the lens raised to the top of the arm, there is about 80 mm of working space between the lens and the stand. From that, you will also have to subtract the height of the circuit board or whatever else you are working on. Die Tiefenschrärfe ist gut und bei der stärksten Vergrösserung hat der focuspunkt immer noch 5cm Abstand vom No-Name-30mm-Schutzglas. I have used both and can tell you that having a stereo scope with variable zoom is the best addition (beyond a really good solder station) that you can make to your electronics bench, and you will find it increasingly more useful as components get smaller and your eyes age. Keep your phone setup for taking photos, but there’s a difference and versatility that you’ll have to experience to understand. One downside of the remote is that (at least on my unit) I need to point the remote exactly at the IR receiver for it to work. So occasionally I need to re-aim and press the button again if nothing happens. UV Filter
Andonstar AD407 Microscope | Elektor Magazine Review: Andonstar AD407 Microscope | Elektor Magazine
If you want to take images or videos for later use, you can store them on a (non-included) SD card. This is done automatically when you press any of the record buttons on the remote or microscope. Photos I have the same need. 3/4″ baltic birch plywood is a snug fit in the yoke. I am going to cut the horizontal arm through yoke and make an extension of a few inches then drill 2 holes in each half to secure. I already have an optical binocular but I don’t like to use it and would prefer a digital microscope. Where earlier versions of digital microscopes required connections to computers or external monitors, they now come with built-in screens. This lets you use them as a stand-alone device.The software of the microscope does what it is supposed to do. You can find several settings for controlling the video output (resolution/frame rate, output frequency, time stamp). There are additional settings that let you alter the image on the built-in screen (3x digital zoom and exposure control). When using the HDMI output, the screen on the microscope itself still works. So you can use two screens at the same time. This feature was not supported on the ADSM302. On that microscope you could use either the built-in screen, or an external one. Exporting Photos & Videos to the SD Card This is simply amazing, this tiny component as compared to my cell phone is now of the size of a cell phone or even larger, I can clearly see each and every detail. I don’t see any prominent noise. But, if in case you see any noise then you can reduce the situration and contrast values on your TV and it will completely remove the noise. Anyway, using the zoom in and zoom out buttons on the remote controller, you can further increase enlarge the subject.
Andonstar – Make the micro world wonderful
It takes around 2 to 3 minutes to fully assemble the Andonstar AD407 Pro Digital Microscope. Link to the video is given at the end of this article. Thanks, Larry. It should be possible to attach a Barlow lens, provided you can find one with the right thread size (30mm).Now, I must admit that it is useful to view a workpiece from an angle sometimes. But you can also place the workpiece at an angle for that, under any digital microscope. For a true 3D microscope you need one with multiple lenses (binocular). Vertical Working Space This is crazy, look at the details, the image is quite sharp and now I can easily read the code which is R2X. We will test so many other things, but first let me explain how to use the menu. Similarly, you can use the remote to change the exposure settings without having to dive into the settings menu, and to adjust the digital zoom without using the hardware buttons. It is a useful addition to the microscope, but if you only use the microscope for SMD soldering you will likely not be using the remote much. Just go ahead and press these buttons it won’t destroy the microscope; if at any point you are not happy with the settings you can press this reset button and it will again set the default values for you. I think I have pretty much explained everything, now let’s go through some of the very basic Parameters before I connect this digital microscope with a large 42 inches screen.
 Great Deal